
#ShotoniPhone
As a director, I like to keep things as simple as possible while striving for great results every time. I prefer working with small crews and lean rigs. Fewer egos, less equipment to lug about, set up and go wrong and a smaller, more agile footprint.
But what if things went nuclear. What if there was no crew and no large and attention-seeking “professional” camera? What if I tried to shoot a professional film on my iPhone?
My recent 5 week trip around Colombia with my partner, Ben and our 3-year-old daughter provided me with the perfect opportunity to find out. And, isolating here in Devon during the 2020 lockdown provided me with the perfect opportunity to edit my film.
Colombia is an amazingly diverse and intriguing place. We always felt safe and welcome and made some family memories that this film will help us to remember long into the future.
If you’re interested in harnessing the power of your iPhone to make your own film here are some tips I learned along the way that you might find useful.

Filming the turtles on the beach in El Valle.

Honey I shrunk the crew
Equipment List
Iphone XR 128GB
Filmic Pro app
Hipstamatic app (for stills)
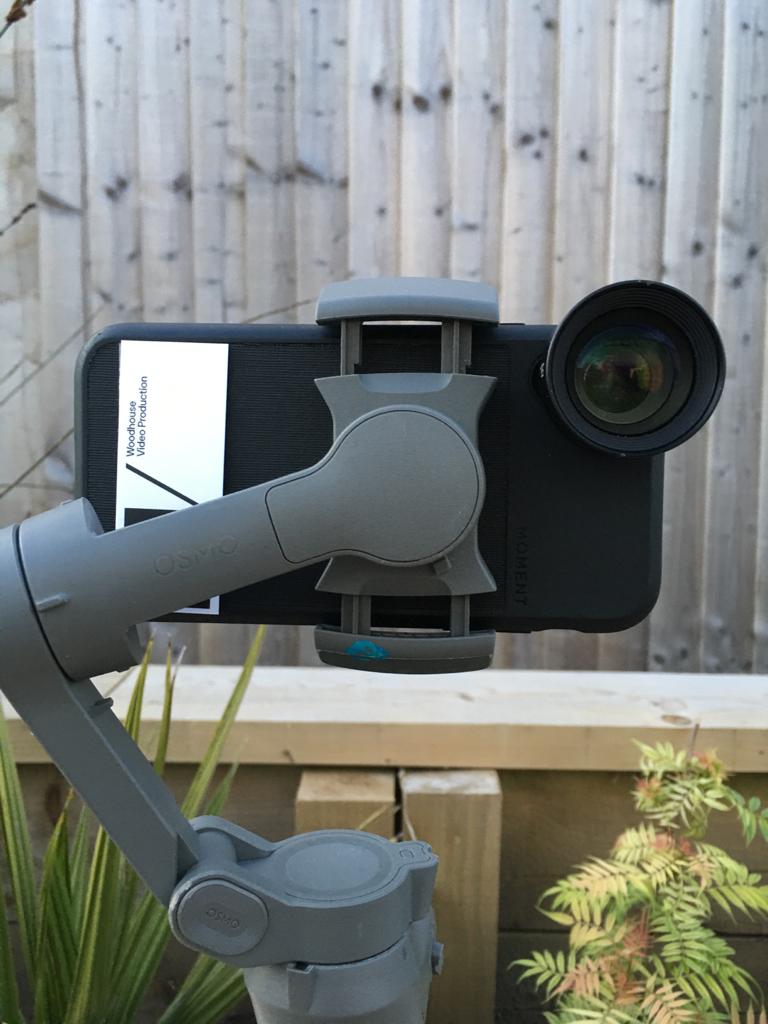
Moment Iphone case (for attaching lenses.)
Moment 58 mm lens
Moment 18mm lens
Moment Macro lens
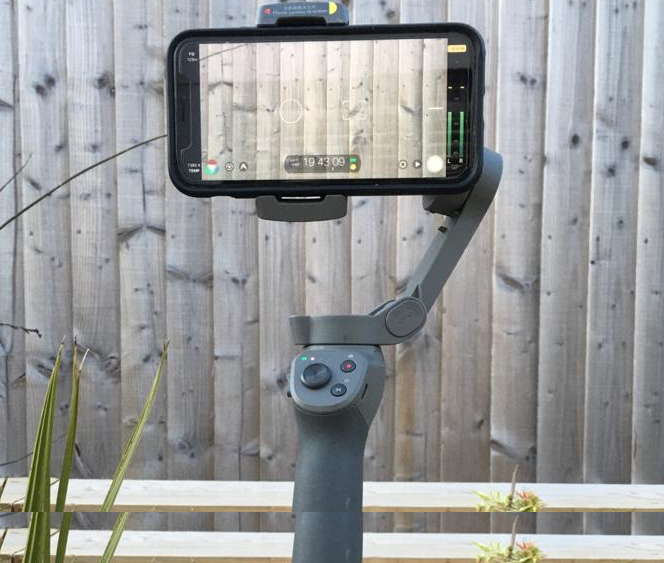
DJI Osmo 2 gimbal
The above weighs nothing. No more than 1KG and after years of travelling around the world with Peli cases, dealing with carnets and excess baggage charges it was a pure joy to be able to chuck all the above in a backpack and head out for the day.
Balancing the DJI Osmo 2 gimbal and Moment Lenses
Despite how-to videos on the internet showing otherwise, achieving perfect gimbal balance with a Moment lens attached to your phone is a process of trial and error. To compensate for the extra weight to the left you have to slide the clamps on the gimbal so they are on top of the side buttons on the left phone. This can cause the emergency SOS function on the phone to trigger which is super annoying. Once cancelled and balance found you should be all set and the alarm won’t go off again until you reclamp the phone back into the gimbal.
I found it easier to balance the phone vertically in 9:16 portrait mode, then turn it on and allow it to find balance and THEN tilt in 90 degrees to become 16:9.


Due to the extra weight of the lenses, the gimbal is put under more strain so the battery does not last as long and occasionally smoothness of pans and tilts can be interrupted by stutter from the gimbal struggling with the additional weight. You often have to shoot several takes to get buttery smooth motion. Also filming in wind, even moderate gusts are problematic. Just adds too much shake and the footage is useless.
Using the Osmo 2 with the moment lenses is not a perfect experience by any means but the increased production value and variety of shots you can achieve far outway the negatives.
Moment Lenses

Shooting with the Moment Macro Lens
Despite the issues with gimbal balance and performance the moment lenses really add to the quality and versatility of the shots you can capture. My go-to lens was the 58mm. It produces gorgeous flare and is perfect for filming more detailed shots of objects at distance.The macro lens was tricky to use but it is magic when you get it right. One of my favourite shots in the whole film is of the moth/fly. The definition is so sharp. When using the macro I found it easier not to use the gimbal, opting to manually hold the phone and ensure where possible part of the diffuser hood was touching a solid object to maintain focal length. I also doubled my frame rate to 48fps so I could slow the footage down and iron out any shaky hand movements!
Audio
All audio was recorded in the internal camera mic. This was very limiting as it distorts easily and vastly exaggerates ambient music and wind noise. In hindsight, I should have invested in a standalone microphone with a windsock to plug into the USBc connection.
The Movo TPM100 looks interesting and it might act as a counterbalance to the Moments lenses too!
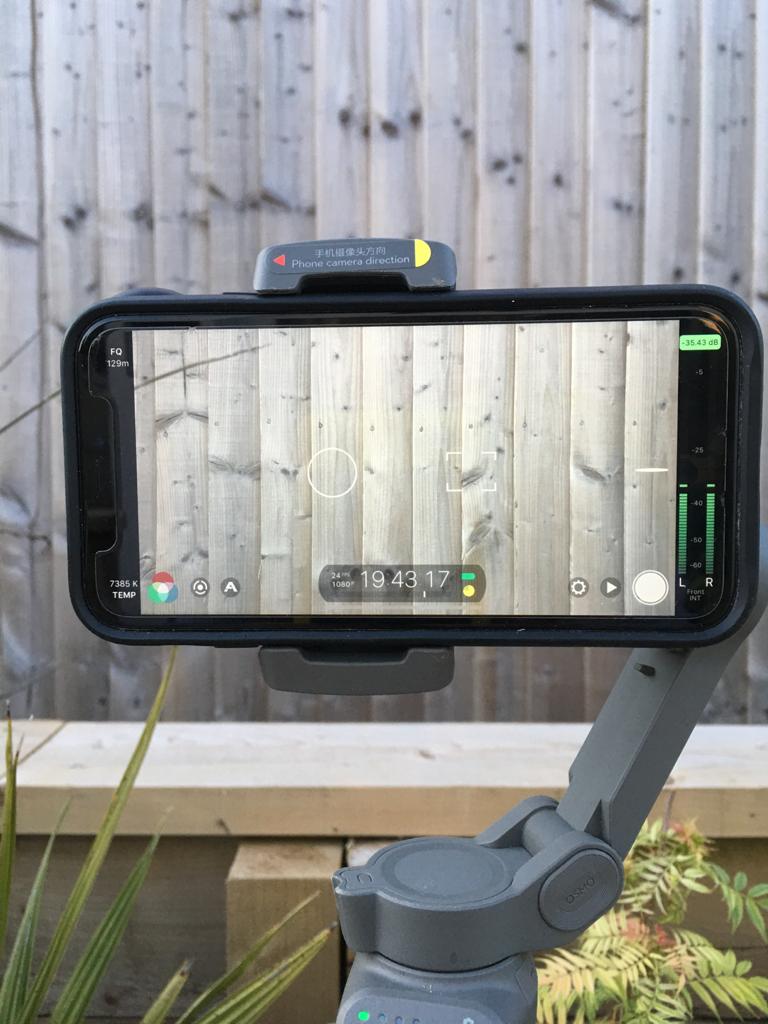
Filmic Pro Settings
24 fps
HD 1080p
Filmic Quality
iPhone Mic (Front), 48.0 kHZ
Save to camera roll OFF
Orientation Lock ON
Stabilization On
Log V2 picture profile (additional in-app purchase of “cinematographer” kit required)
White Balance set and locked to daylight if shooting outside (annoyingly you need to re-lock/set your white balance each time you restart the app)
Filmic Pro Positives
For me, the ability to film in a log picture profile with 2.5 stops more of dynamic range elevates your results and I would certainly recommend spending the small amount of money (£13) to unlock this feature. The flat footage graded up nicely in Premiere Pro with very minimal work. There is an easy to use LUT pack that you can download here that is not instantly transformational but with additional grading works great:- https://www.filmicpro.com/luts/
The exposure wheel is super reliable. Just make sure you click the very lightest, most blown out portion of your image to achieve the best exposure.
The focus ring is an excellent mimic of a manual lens and it is easy to achieve pin point focus and pull off those pull focuses!
Filmic Pro Negatives
Filmic Pro drains the battery on your phone very quickly and makes the phone red hot to touch after about 15 minutes of filming. This means that you can only film for a short period of time before essentially letting the phone cool and rest. This was fine for recording as I was shooting in small daily intervals but filming long clips, say 5 mins plus causes the phone to overheat and the app to crash and lose the footage. Believe me, I learned this the hard way as before Colombia I tried to film my friend’s wedding ceremony – that went on for 40 minutes – and lost most of the footage due to overheating and corruption. Certainly, if you were filming a commercial job with talent you would need multiple phones to keep rolling reliably (which defeats the point a bit I feel !!)
Another key point to keep your footage safe is to make sure you don’t save your clips to your internal camera roll. Opt to save them in the app itself by setting “save to camera roll” to OFF. Transfer them by plugging your phone into a computer and using iTunes to drag them across to your drives.
Filmic pro works best in strong daylight. All my night footage was ghastly and unusable due to the amount of grain in the shadows.

Cartagena at sunset. Taken on Hipstamatic.
Wow Nicky that was really special. I am genuinely impressed that this little film was shot on your iphone! It’s credit, obviously, to the incredible technology that we all carry around in our pockets and all take for granted these days, but also to your ingenuity and creativity. Well done!
I hope you and your team (and family) continue to stay safe and busy.
All the best from the other Cartagena, in Spain!
Tom Fellows